How to Cook the Perfect Steak: Temperatures, Methods & Pro Tips
Master steak doneness with our complete guide. Internal temperature chart, the hand touch test, five cooking methods (grill, cast iron, oven, sous vide), preparation tips, and popular cuts explained.

Why Nailing Your Steak Matters
There's something deeply satisfying about slicing into a perfectly cooked steak — that gorgeous pink center, the sizzling crust, juices pooling on the plate. Whether you're firing up the backyard grill for a Saturday cookout or treating yourself to a weeknight ribeye, knowing how to cook steak properly is a game-changer. The difference between a memorable meal and a rubbery disappointment often comes down to just a few degrees.
The good news? Once you understand the fundamentals — internal temperatures, preparation techniques, and resting — you'll consistently turn out restaurant-quality results. Let's break it all down.
Steak Doneness Temperature Chart
A reliable instant-read thermometer is the single best investment you can make for steak. Forget guessing — here are the exact target temperatures to pull your steak off the heat (it will rise 3-5°F during resting):
| Doneness | °F | °C | What You'll See | Best For |
|---|---|---|---|---|
| Blue Rare | 115–120 | 45–49 | Cool, bright red center | Bold palates & high-quality cuts |
| Rare ⭐ | 125–130 | 50–54 | Warm red center, very soft | Filet mignon, tenderloin |
| Medium Rare 🏆 | 130–139 | 55–59 | Warm pink throughout, juicy | The gold standard — works with any cut |
| Medium | 140–149 | 60–65 | Light pink center, firmer | Balanced flavor & texture |
| Medium Well | 150–159 | 66–70 | Faint hint of pink, drier | Those who prefer less pink |
| Well Done | 160+ | 71+ | Uniformly brown, firm | Burgers and ground meat (safety) |
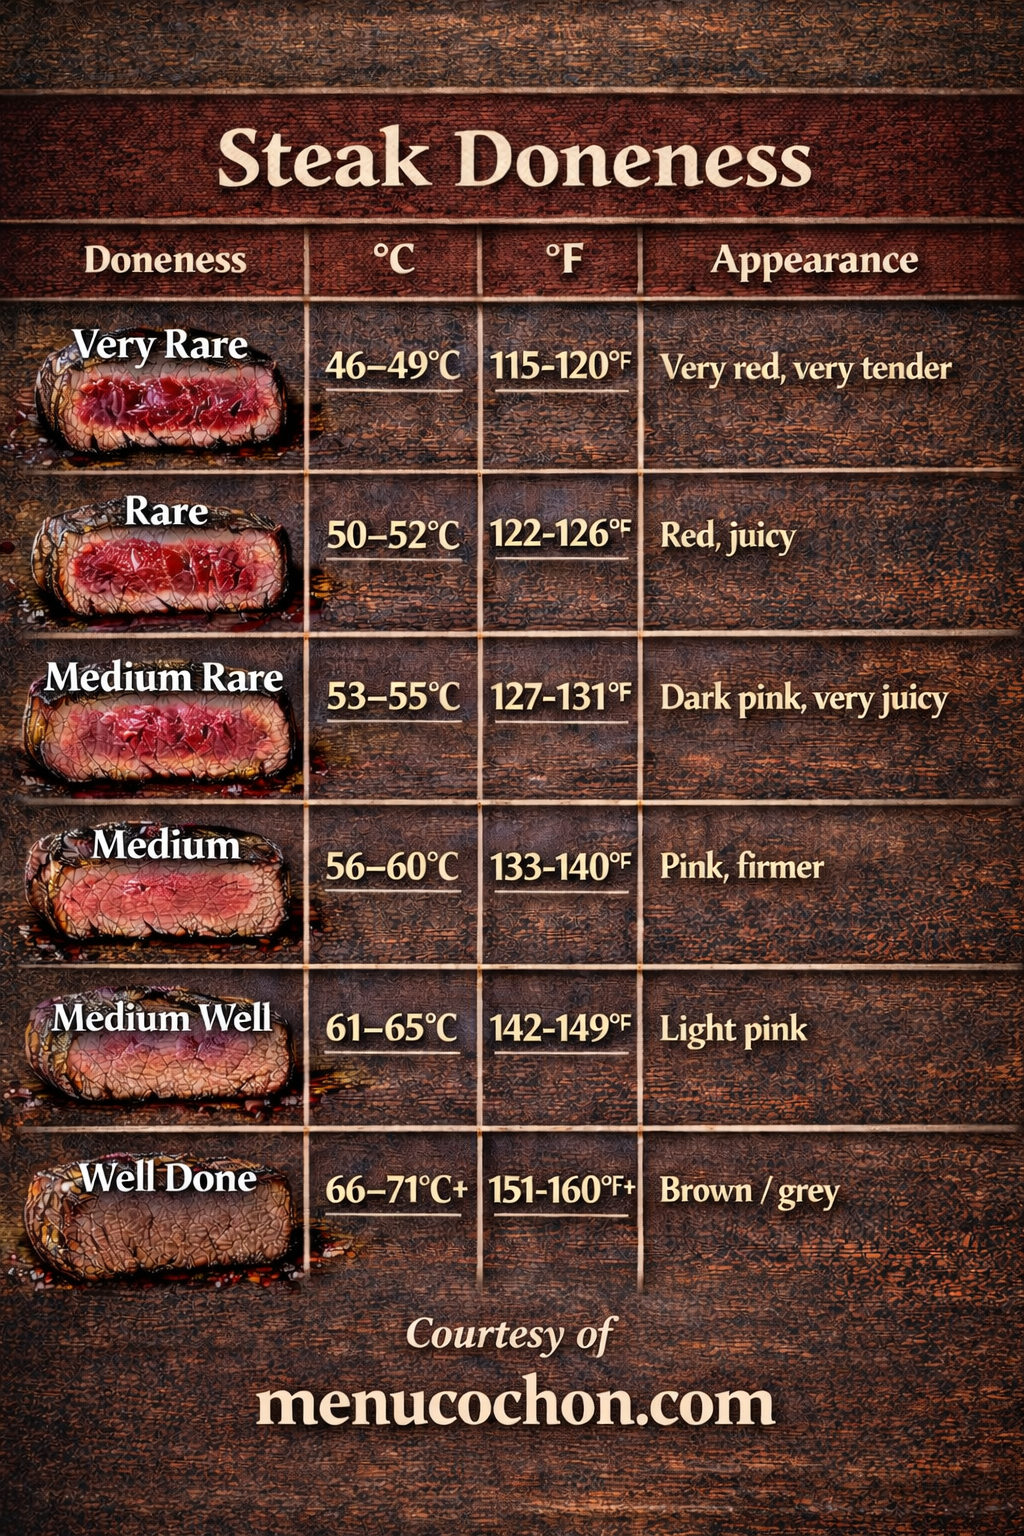
Visual reference for steak doneness levels
Pro tip: Always pull your steak 5°F before your target. Carryover cooking will bring it to the perfect finish while it rests.
The Hand Test: No Thermometer? No Problem
Left your thermometer inside? You can estimate doneness using the fleshy part of your palm. Open your hand, relax it, and press the base of your thumb with your other index finger — that's what raw steak feels like. Now touch your fingertips together one at a time:
- Thumb to index finger: The base of your thumb feels soft and yielding — similar to a rare steak
- Thumb to middle finger: Slightly more resistance, a gentle bounce — that's medium rare
- Thumb to ring finger: Noticeably firmer with some give — this is medium
- Thumb to pinky: Tight and firm — you've reached well done territory
This technique takes practice, but after a few steaks you'll develop the muscle memory. That said, a thermometer removes all guesswork — use both methods together for the best results.
Cooking Methods: Pick Your Weapon
Charcoal Grill
Nothing beats the smoky flavor of charcoal. The key is creating two heat zones — pile coals on one side for intense direct heat, leave the other side empty for indirect cooking.
- Get the grate screaming hot before your steak goes on
- Sear over direct heat for 2-3 minutes per side to develop a deep crust
- Slide to the cooler zone, close the lid, and let it finish to your target temperature
- For steaks thicker than 1.5 inches, reverse the order: start indirect, finish with a sear
Gas Grill
Convenience meets performance. Crank all burners to high and close the lid for 10-15 minutes to preheat — this is non-negotiable for a proper sear.
- Set up dual zones: high heat on one side, medium on the other
- Sear on high for 2-3 minutes per side until you see deep grill marks
- Move to medium heat and cook with the lid down until you hit your target temp
- Avoid pressing down on the steak — you're squeezing out flavor
Cast Iron Skillet
If you want the best crust possible, cast iron is your answer. The heavy pan retains heat like nothing else, giving you an even, crackling sear across the entire surface.
- Heat the skillet over high heat until it's just barely smoking
- Add a high smoke-point oil (avocado or grapeseed), then lay the steak away from you
- Sear 3 minutes per side without moving it — let the crust form
- In the last minute, add butter, crushed garlic, and fresh thyme. Tilt the pan and baste the steak with the foaming butter
- This butter-basting technique is what steakhouses use — it's a game changer
Oven: The Reverse Sear
The reverse sear gives you edge-to-edge even doneness with a killer crust. It's the preferred method for thick-cut steaks (1.5 inches or more).
- Preheat your oven to 250°F (120°C)
- Place the steak on a wire rack over a sheet pan
- Cook until the internal temperature is 10-15°F below your target (this takes 30-45 minutes depending on thickness)
- Pull it out, heat a cast iron pan until smoking, and sear each side for 60-90 seconds
- The result: a uniformly pink center from top to bottom, with a dark, caramelized exterior
Sous Vide
For absolute precision, sous vide is unbeatable. You're cooking the steak in a temperature-controlled water bath, so it's physically impossible to overcook.
- Season and vacuum-seal your steak
- Set your immersion circulator to your exact target temperature (e.g., 130°F / 55°C for medium rare)
- Cook for 1-2 hours — the timing is flexible, which is the beauty of it
- Remove, pat completely dry, and sear in a ripping-hot pan for 45-60 seconds per side
- The sear is critical — sous vide alone won't give you that Maillard crust
Preparing Your Steak: The Steps Most People Skip
Great steak starts before the heat. These preparation steps make a bigger difference than most people realize:
Bring It to Room Temperature
Pull your steak from the fridge 30-45 minutes before cooking. A cold steak hitting a hot pan will sear unevenly — the outside overcooks while the center stays raw. Letting it temper ensures more consistent results.
Dry the Surface Thoroughly
Moisture is the enemy of a good sear. Pat your steak dry with paper towels on both sides. Wet surfaces steam instead of browning, and steaming means no crust. Some pitmasters even leave steaks uncovered in the fridge overnight on a rack — this dries the surface dramatically.
Salt Early (or Right Before)
You have two windows for salting: at least 40 minutes ahead (so the salt draws out moisture, dissolves, and gets reabsorbed) or immediately before cooking. Salting 5-20 minutes before is the worst timing — the salt pulls out moisture that sits on the surface and prevents browning.
Pepper After Cooking
Black pepper burns at high temperatures and turns bitter. Season with freshly cracked pepper after you pull the steak off the heat, or add it during the final baste.
Choose the Right Oil
Use an oil with a high smoke point: avocado oil, grapeseed, or refined canola. Extra virgin olive oil smokes too quickly for a proper sear. Save the good olive oil for finishing.
Know Your Cuts
Different cuts have different strengths. Here's a quick breakdown of the most popular steaks:
- Filet Mignon (Tenderloin): The most tender cut on the animal. Lean and buttery, with a mild flavor. Best cooked rare to medium rare. Premium price tag.
- Ribeye: Heavily marbled with intramuscular fat, which means maximum flavor and juiciness. The fat cap renders beautifully on high heat. The connoisseur's steak.
- New York Strip: A great all-rounder — tender enough to be enjoyable, flavorful enough to be satisfying. The fat strip along one edge adds richness.
- T-Bone / Porterhouse: Two steaks in one: strip on one side, tenderloin on the other. The Porterhouse has a larger tenderloin portion. Impressive on the plate.
- Flank / Skirt: Leaner, more affordable cuts with robust beefy flavor. Best when marinated, cooked hot and fast to medium rare, and sliced thin against the grain.
Resting: The Most Important Step You're Probably Skipping
You've seared, you've temped, you've hit your target — now comes the hardest part: waiting.
When steak cooks, the heat drives moisture toward the center. If you cut into it immediately, all those juices flood out onto your cutting board instead of staying in the meat. Resting allows the muscle fibers to relax and redistribute those juices evenly throughout the steak.
- Transfer the steak to a cutting board or warm plate
- Tent loosely with aluminum foil — don't wrap tightly or you'll steam the crust
- Wait 5 minutes for standard cuts, 10 minutes for thick steaks or roasts
- The internal temperature will continue to rise 3-5°F during this time (carryover cooking)
This single step is what separates a good steak from a great one. Be patient — it's worth every second.
Put It All Together
Mastering steak isn't about expensive equipment or secret techniques — it's about understanding a few key principles and executing them consistently. Get a good thermometer, learn your preferred doneness, nail your preparation, and always let it rest.
Now fire up that grill and put these techniques to work. Check out our beef recipes for inspiration — from classic grilled ribeyes to smoked brisket, we've got you covered.
